Have you ever considered crawl space encapsulation as a solution for your wet basement woes? This process involves creating a moisture-resistant barrier that not only keeps your basement dry but also improves your home’s energy efficiency. It’s a comprehensive method to tackle dampness, mold, and humidity issues that are often associated with basements. But is it the right solution for you? Stick around as we explore the ins and outs of crawl space encapsulation and find out whether it’s worth your investment.
Key Takeaways
- Crawl space encapsulation is a moisture control method, providing a comprehensive solution to basement dampness by sealing the area with a polyethylene barrier.
- Encapsulation effectively reduces humidity levels, prevents moisture infiltration, and discourages pest infestations, thereby enhancing the overall indoor air quality.
- The installation involves assessing the area, cleaning it, installing moisture barriers, insulating, sealing the foundation, and a final thorough check-up.
- Despite initial costs of materials, labor, and potential additional expenses like dehumidifiers, encapsulation is a long-term investment that protects home value and reduces future repair costs.
- Alternatives to encapsulation include foundation drainage, sump pumps, dehumidifiers, basement waterproofing, landscape grading, and improved insulation techniques.
Understanding Basement Dampness
Before you dive into the process of crawl space encapsulation, it’s crucial to grasp why basements often become damp. The primary culprits are moisture sources such as leaks, condensation, and groundwater seepage. These moisture sources often lead to high humidity levels, which can exacerbate the dampness in your basement.
Drainage solutions can help manage water intrusion, but they may not be enough if ventilation options aren’t considered. Poor ventilation can trap humid air, encouraging mold growth and potentially causing water damage.
Foundation issues may also contribute to a damp basement. If your foundation has cracks or isn’t adequately waterproofed, it can allow water seepage. This can further lead to dampness and potential water damage.
Insulation types can also play a significant role. Poor or inadequate insulation can lead to heat loss, contributing to condensation and increased humidity levels.
Don’t forget about the impact of seasonal changes and climate on your basement’s dampness. Warmer climates or seasons can increase humidity, while colder ones can lead to condensation issues.
Understanding these factors is the first step in preventing basement dampness and mold, and protecting your home from water damage.
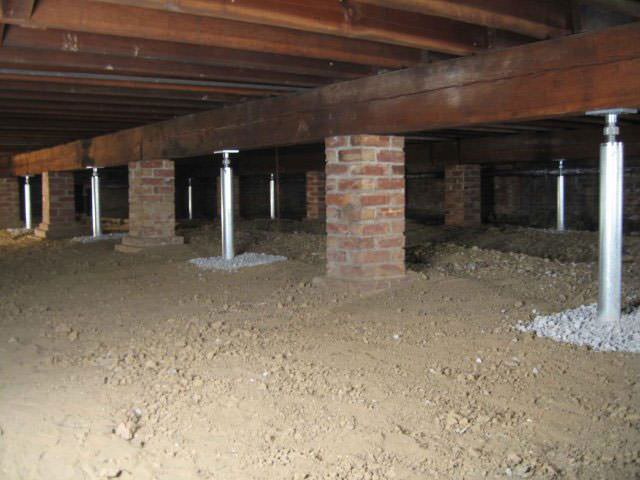
What Is Crawl Space Encapsulation?
A staggering number of homes have crawl spaces, yet many homeowners remain unsure about what crawl space encapsulation is. This procedure is a moisture control method used to prevent dampness from plaguing your home. It involves sealing the crawl space with a heavy-duty polyethylene barrier to keep moisture out.
When you encapsulate your crawl space, it’s not just about covering the floor. The encapsulation process extends up the walls and often even covers the ceiling of your crawl space. This creates a fully encapsulated area that’s separate from the outside elements.
Crawl space encapsulation is vitally important for maintaining good air quality in your home. By controlling the moisture level, it helps prevent the growth of mold and mildew, which can have serious health implications.
It also helps prevent pests, which are often attracted to damp environments.
In a nutshell, crawl space encapsulation is a powerful tool in the fight against basement dampness, poor air quality, and the many issues that can arise from these conditions. It’s an investment in the health and longevity of your home.
The Science Behind Encapsulation
Understanding the science behind encapsulation can greatly demystify the process for you. This method is a comprehensive approach to moisture control and air quality improvement, primarily in your home’s basement or crawl space. It works on the principle of creating a barrier between the ground and the interior of your home.
- Vapor Barrier: It starts with the installation of a vapor barrier, a plastic or foil sheet, which prevents water vapor from the ground from penetrating your home. This helps in maintaining a dry environment and reduces the chance of mold growth.
- Sealing: The next step involves sealing off vents and openings that allow humid outdoor air to enter the space. This helps in controlling the humidity levels and improves your home’s air quality.
- Conditioning: The final step is conditioning the air in the space, which can involve dehumidifiers or other HVAC components to maintain a healthy and controlled environment.
Materials Used in Encapsulation
Choosing the right materials plays a crucial role in the success of your crawl space encapsulation. Moisture barriers are essential to prevent water intrusion; they’re typically made of polyethylene plastic, ranging from 6 to 20 mils thick. The thicker the barrier, the more durable and effective it’s against moisture seepage.
Incorporating a drainage system and sump pumps can further safeguard your crawl space from water damage. These systems channel water away from the foundation, crucial for foundation repair and prevention.
Insulation types vary, but closed-cell spray foam is often favored for its dual role as an insulation and a vapor retarder. This material prevents heat loss and deters vapor intrusion, aiding in humidity control.
Sealing techniques are vital to ensure airtight encapsulation. Special tapes and sealants are used to cover seams and junctions, enhancing the effectiveness of the moisture barrier and vapor retarder.
Lastly, maintaining air circulation is key for mold prevention. A dehumidifier can help control the humidity levels, preventing the growth of mold and mildew.
The Encapsulation Process
Now that you’re familiar with the materials essential for encapsulation, let’s move on to the encapsulation process itself.
It’s crucial to understand the basics of encapsulation before you start. From preparation to final touches, we’ll guide you step-by-step through the entire process, ensuring you’re well-equipped to tackle this task.
Understanding Encapsulation Basics
Often, homeowners overlook the importance of encapsulating their crawl spaces. It’s more than just a protective measure for your home—it’s an investment in its structural integrity, energy efficiency, and the health of those living within it.
Encapsulation acts as a moisture control measure, reducing humidity which in turn improves the air quality within your home.
- Moisture Control and Humidity Reduction: By using a vapor barrier, encapsulation prevents ground moisture from entering your crawl space. This reduction in humidity protects your home from potential mold and mildew growth, contributing to better air quality.
- Insulation Benefits and Pest Prevention: Encapsulation insulates your crawl space, reducing energy loss and increasing energy efficiency. This insulation also creates an environment that’s unwelcoming to pests.
- Structural Integrity and Cost Savings: Over time, moisture can damage the structural integrity of your home. By reducing this moisture, encapsulation protects your home’s structure, potentially saving you from costly repairs in the future.
Necessary Encapsulation Materials
Gathering the right materials is an essential first step in the encapsulation process.
It’s crucial to consider vapor barriers, a key component for moisture control. These durable plastic or foil sheets will prevent moisture from permeating your crawl space, thus regulating humidity.
Equally important are drainage systems. These ensure any water that does find its way in has an effective exit route. Sump pumps, part of this system, actively remove water, keeping the space dry.
Insulation types are another component to consider. Closed-cell spray foam and rigid foam board are common choices. They’re efficient for temperature regulation and moisture control, aiding in the overall air circulation within the space.
Foundation sealing is required to ensure no openings allow for moisture or pests entry. It’s a vital part of maintaining a dry, clean crawl space.
Lastly, consider a dehumidifier for humidity regulation. This device will help maintain optimal air quality, preventing mold growth and other moisture-related issues.
Steps in Encapsulation Process
Having rounded up the necessary materials for your crawl space encapsulation, it’s time to get to work. The encapsulation process focuses on enhancing structural integrity, foundation protection and energy efficiency. It involves three primary steps:
- Preparation: You’ll start by addressing any existing issues such as pest infestations or faulty drainage systems. It’s crucial to ensure proper air circulation and humidity control before moving on.
This stage may involve installing new insulation options or reinforcing existing ones.
- Installation: Next, you’ll install the moisture barrier and vapor barriers. These are key to prevent moisture from permeating your crawl space, thereby preserving the structural integrity of your home.
- Sealing: Lastly, you’ll seal off the crawl space. This encapsulation creates a controlled environment, reinforcing foundation protection and promoting energy efficiency.
Costs of Crawl Space Encapsulation
Now that you’re familiar with the encapsulation process, it’s crucial to understand the costs of crawl space encapsulation which can vary significantly.
This includes encapsulation material costs, labor and installation charges, and potential additional expenses.
Each of these components can influence the overall cost, making it essential to consider all aspects when planning your budget.
Encapsulation Material Costs
Understanding the costs associated with encapsulation materials is crucial when planning for crawl space encapsulation. These materials greatly influence the cost effectiveness of the project. It’s vital to balance material quality with budget constraints to ensure long term savings.
- Material Quality and Cost Effectiveness: Both these factors are interlinked. High-quality materials, while more expensive initially, can offer greater durability and effectiveness, resulting in less maintenance requirements over time.
They also often come with robust product warranties, providing additional peace of mind.
- Installation Options: The type of encapsulation material chosen can impact installation options. While some materials may be cheaper, they may require professional installation, increasing overall costs.
Conversely, higher-priced materials might allow for DIY installation, potentially offsetting the initial cost increase.
- Regional Pricing and Environmental Impact: Prices can vary regionally based on availability and demand. It’s important to research local market prices before making a decision.
Also, consider the environmental impact of your chosen materials. More sustainable options may be slightly more expensive upfront, but can contribute to long term savings by reducing energy use and potential future repair costs.
Labor and Installation Charges
You’ll find that labor and installation charges form a significant part of your crawl space encapsulation costs. The labor costs typically cover the skilled work involved in encapsulating the space.
The installation charges, on the other hand, include the cost of setting up the encapsulation materials and sealing the space effectively.
When considering contractor selection, you’ll want to seek expert advice and ensure the chosen professional offers quality workmanship and uses quality materials. This will ensure the longevity of the encapsulation, thus saving you from frequent repair costs.
DIY options are also available if you’re looking to save on labor costs. However, it’s important to remember that this requires a certain level of expertise and the right installation tips to ensure a proper job.
Regional pricing can also affect the overall cost of your project. Certain areas may have higher labor costs due to demand, cost of living, or other regional factors.
Warranty considerations should also be part of your decision-making process. A contractor who provides a warranty can give you peace of mind and protect you from additional costs down the line.
Lastly, the project timeline can influence labor costs. Longer projects will generally cost more due to the extended labor involved.
A clear expense breakdown provided by your contractor will help you understand where your money is going.
Potential Additional Expenses
While the primary expenses of crawl space encapsulation include materials and labor costs, there are potential additional expenses that you should be aware of. These unforeseen costs can sneak up on you and might include additional maintenance, unexpected repairs, and the need for enhanced moisture control.
- Additional Maintenance: Over time, encapsulated crawl spaces may require extra care, such as periodic inspections and resealing any tears or punctures. This ensures the long-term savings and effectiveness of your investment.
- Unexpected Repairs: Installation complications may arise, causing delays and increasing labor costs. For example, existing damage or infestations may need remediation before encapsulation can proceed.
- Enhanced Moisture Control: Depending on your property’s climate impacts, you may need to install a dehumidifier for optimal moisture control, raising your initial investment.
However, don’t let these potential costs deter you. The benefits of crawl space encapsulation – improved air quality, pest prevention, and energy efficiency – can significantly increase your property value.
It’s an investment that can lead to substantial long-term savings, making it a worthwhile consideration for any homeowner.
Pros and Cons of Encapsulation
Encapsulating your crawl space can offer significant benefits, but it’s crucial to consider its potential drawbacks as well.
A thorough benefits analysis shows that encapsulation can drastically reduce moisture levels in your basement, preventing damage to your home’s structure. Encapsulation can also improve your home’s energy efficiency, as it reduces the amount of cold air entering your home, thereby lowering your heating costs.
However, it’s equally important to carry out a drawbacks assessment. The process of encapsulation can be quite costly up front, and it may take several years to recoup your investment through energy savings.
The installation process can also be disruptive, and if not done correctly, it may lead to further issues down the line. Additionally, encapsulation may not be the most effective solution if your home has severe moisture problems or if it’s situated in an area with a high water table.
Comparing Other Wet Basement Solutions
Having considered the advantages and disadvantages of encapsulation, it’s now time to explore other potential solutions for dealing with a wet basement. Each alternative comes with its own set of considerations and potential benefits.
- Foundation Drainage and Sump Pump: Installing a foundation drainage system coupled with a sump pump can help keep the water out. It’s a proactive measure that prevents water from accumulating, offering a solution for reducing humidity levels and preventing mold growth.
- Dehumidifier Installation and Ventilation Systems: A dehumidifier works to extract excess moisture from the air, achieving effective humidity control.
Meanwhile, enhancing ventilation improves air circulation, which aids in mold prevention and promotes a healthier environment.
- Basement Waterproofing and Landscape Grading: Waterproofing your basement creates moisture barriers that prevent water seepage.
Landscape grading, on the other hand, can direct water away from your home’s foundation, reducing the likelihood of water intrusion.
Additionally, insulation techniques can also play a significant role in maintaining a dry basement.
Encapsulation Results: Case Studies
Your journey into the world of crawl space encapsulation wouldn’t be complete without examining real-life case studies that exemplify its effectiveness.
One such case involved a homeowner in Atlanta who battled with a consistently damp basement. After encapsulation, the moisture levels dropped dramatically, improving the indoor air quality and eliminating the previous mold threat.
Another significant case study comparison is of a house in Seattle. The homeowner, initially skeptical, decided to give encapsulation a shot after exhausting other solutions.
Post-encapsulation, the previously persistent water intrusion problem was resolved, and the energy bills reduced significantly. This highlighted encapsulation’s effectiveness not only in moisture control but also in energy efficiency.
Lastly, let’s look into a case from Florida. The homeowner was dealing with severe pest infestation due to the wet basement.
After encapsulation, the pest issue was virtually eliminated, proving that encapsulation could also work as an effective pest deterrent.
These case studies provide concrete proof of encapsulation effectiveness. They underline the fact that encapsulation isn’t just a solution in theory.
It’s a practical, functional, and efficient solution for wet basements that has been tested and proven in real-life scenarios.
Frequently Asked Questions
Is Crawl Space Encapsulation Suitable for All Types of Houses?
Yes, crawl space encapsulation is suitable for all types of houses.
Regardless of your home’s style or age, encapsulation offers numerous benefits. It can control moisture, prevent mold growth, and improve indoor air quality.
However, consider the specific needs of your home, as some crawl space types may require additional measures.
Always consult a professional for personalized advice. It’s a worthwhile investment, enhancing your home’s safety and value.
How Long Does a Crawl Space Encapsulation Last?
A crawl space encapsulation can last for many years, even decades, if it’s installed correctly and maintained well.
Regular inspections and prompt repairs are key. You’ve got to keep an eye out for any signs of damage or moisture.
Go through the installation process with a professional to ensure it’s done correctly.
What Are the Early Signs That My Encapsulation Needs Repairs?
You’ll first notice a change in your home’s moisture levels. This could mean a musty smell or an increase in mold growth.
You might also see pests more frequently, as they’re attracted to the damp environment.
Insulation issues such as sagging or damp insulation are other early signs.
If your energy bill is higher without a change in usage, it’s possible your crawl space encapsulation needs repairs.
Don’t ignore these signs; act quickly.
Can Crawl Space Encapsulation Increase My Property Value?
Absolutely, crawl space encapsulation can boost your property value.
It’s often seen favorably in property appraisals. By preventing moisture damage, it enhances the structural integrity of your home, which adds to the resale potential.
Buyers appreciate the added benefit of reduced utility costs and a healthier living environment.
Does Crawl Space Encapsulation Have Any Impact on Indoor Air Quality?
Absolutely, crawl space encapsulation can positively impact your indoor air quality.
It provides effective moisture control, preventing damp conditions which can breed mold and mildew. This contributes to cleaner, healthier air.
Moreover, encapsulation can improve air purification by reducing allergens and pollutants that often seep in from an unsealed crawl space.
Conclusion
So, you see, crawl space encapsulation isn’t just a quick fix for a wet basement. It’s a strategic, long-term solution that can enhance your home’s air quality, protect its structure, and boost energy efficiency. Despite the upfront cost, it’s a worthwhile investment considering its numerous benefits. But remember, it’s vital to compare other methods and make an informed decision. After all, your home’s health and your comfort depend on it.

Rob VanSuilichem
Serving Michigan homeowners for over 32 years, Everdry is one of the Nation’s largest and most experienced waterproofer.
Locally owned, operated and staffed, Everdry professionals take a personal one-on-one approach in educating homeowners so they truly understand all their options for creating a safe, dry, healthy and usable space in their basements.
What Sets Us Apart
- Unbeatable quality due to the experience of the owners and staff.
- Unbeatable value due to the efficiency and expertise of more than 32 years of experience.
- Unbeatable value due to the purchasing power of being one of the largest waterproofers in the nation.
- Unbeatable service due to the fact that EverDry is a locally owned and operated company.
Credentials Include:
- Members of the Home Builders Association
- H.U.D. evaluated
- I.C.C. evaluated (Report #94-07)
- Better Business Bureau Accredited with the Eastern and Western Michigan BBB
- Fully Licensed and Insured
The aforementioned memberships are important because we benefit from the constant exchange of information and knowledge. We are updated on everything from installation techniques, to customer service improvements. You benefit in the knowledge that these third party inspection agencies require us to meet stringent requirements to remain members in good standing.
Better Business Bureau
We have been nominated and won the prestigious Better Business Bureau’s Torch Award for Ethics many times, Chosen as a W.Mich.BBB Torch finalist in 2014 & 2015, Won the Torch Award for Ethics in 2016, Won the Eastern Michigan BBB Torch Award in 2019 and was also chosen as a Western Michigan BBB Torch finalist in 2019. Won the Eastern Michigan BBB Torch Award in 2023 and Finalist for the Western Michigan BBB Torch Award in 2020 & 2021!
Mission Statement
To create raving fans of our customers and employees through frequent contact, constant training, a commitment to excellence and unlimited opportunity.